Pages

Thursday, December 30, 2010

Did you hear about the Silhouette giveaway???

My debate on which electronic cutter to get has been dragging out for a year now. Just when I think okay I want a cricut, think but wait there is also the gazelle and then I'm back at square one again. However after seeing the Silhouette demo at the Scrap Expo a couple months back I must say I kinda fell in love with it.
Today, like 10 min ago, I found out that they are giving one away! Want to enter to win? Head over to Brown Paper Packages for more details and sign up for your own chance to win.

This would be one seriously cool win, I mean come on just look at how cute it is!


Wish me luck and good luck to you if you enter to win it too,

Wednesday, December 29, 2010

Best Christmas gift ever....I do believe so.

Now that Christmas is passed I can share with you the story of my Christmas gift. This year all I wanted was a wooden storage solution for my SU ink pads (I'm not a fan of the plastic ones) so I showed my DH a few examples I've seen around of what I wanted him to attempt to make for me. He said sure no problem but somewhere in all of the panning it went from a small ink storage system and morphed into a full blown desk! See my little plastic table started bowing slightly in the middle, rendering it unlevel which aggravated me to no end since I like to stamp a lot. Anyways here's the tale of my table.....(don't mind the messy garage)

Did you know that Home Depot will cut your boards for you? Since we don't have a table saw yet this little fact came in very handy.

Here is Flipper inspecting all the new things in the garage. I like to call him my old man cat even though he's just 4 years old because he gets in these moods....like a pissy old man.


Slav said, " Argh I forgot to buy clamps to hold the in place." I said, "dude we still have boxes of tile, if all you need is weight save the money and use heavy things in the garage." Another great problem solved and money saved thanks to my quick thinking!


This is one of the lets of my table, its laying on it side. The table top weighs about 100lbs so we needed strong support below. No particle board here, this desk is all solid old fashioned wood!


Here we have 2 completed legs that will eventually house drawers of various sizes to organize my papery goodness!


Here is Slavic scraping the top of the table to level it out with his new wood working tool that was a early Christmas gift from my Nana. Right after we got the table perfectly smooth my MIL saw it and was loving it but then she went upstairs and I went for the hammer and chains. I proceeded to beat the hell out of my table with anything hard I could find, I really liked the texture I was getting from the small end of the vice grips. My MIL came out and almost started to cry at the sight of my freshly distressed table but eventually she calmed down and let me finished the distressing. 


We used a Red Mahogany Oil Stain first, going heavier in some spots but upon drying I didn't like it. So I added some pale blue paint to it and then ran upstairs, grabbed the Distress Ink Pads (I was not about to assault my SU pads but my TH ones I wasn't too worried about) and started to go to town on the table. I realized I needed more deep brown so I used my Early Espresso re-inker to really darken up areas of the table. Right after this Slav added 2 Satin Clear coats to finish it off.


here is a close up shot of the pretty wood but the lighting has slightly distorted the color so between this photo and the others below you'll get the idea.


For Christmas my MIL got me those pretty vinyl flowers so I put those up once my new space was squared away.


He made my desk a few inches wider then the plastic table, I really didn't think a few inches would feel like much of a difference but now I feel like I can breath easily and have more space to work in.


So that was my Christmas gift, after he put my desk in he decided I needed utilize my walls better so he started playing with my tools like puzzle pieces. The bottom part of my desk isn't finished yet but once he gets around to it, I'll be posting those as well. 

Talk to ya'll later,


PSC: Just Because


Here is another card created via my PSC (Personal Scrap Cleanup) mission. 
This card was based off of a very ugly tag I had gotten in a kit, I know it wasnt the tags fault but the colors were kinda fugly so I flipped it over and used the backside which was a nice shade of white...I can work with that! For the flower I decided I would stamp it but also add a touch of embossing powder to it to give it a little shine.

What I used on this card:
  • Paper: Rich Regals-Polka Dots (SU), Brown (unknown),  Tag (kit left over), Vintage Paper (DCWV), White Cardstock (generic)
  • Ink: Always Artichoke, Bravo Burgundy and Early Espresso.
  • Bling (unknown)
  • Stamps: Happiness Shared, Notably Ornate
  • Fibers (unknown)

Thanks for swingin by,

PSC: Thank You card


I had a whole bunch of Church Carolers come to my house 2 nights ago to sing to Babushka (DH Grandma), so while there were singing to her I was busy making this little card for them. This also gave me a chance to use some of my new inks and stamps I got for Christmas too. 

What I used on this card:
  • Paper: White (generic), Purple Polka dots (SU Regals)
  • Stamps: Notably Ornate, Happiness Shared
  • Ink: Crumb Cake, Always Artichoke (this is quickly becoming one of my favorite greens!) and Bravo Burgundy (SU-Classics)
  • Stampin' Write Markers: Certainly Celery and a Blank one temp. tinted with Milled Lavender (TH Distress ink)
Thanks for stopping' in,

PSC: Altered Box


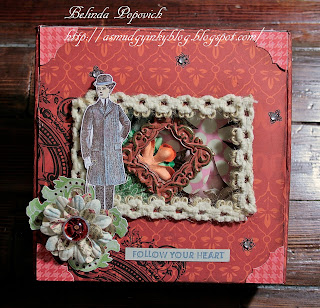
This is the first piece I made on my new desk. I was trying to organize things on top when I decided I wanted to keep my flowers on top for easy access since I got some great new Prima's in my stocking. I took K&Co box that was filled with Christmas chipboard pieces and decided to give it a better purpose.


This was a fairly easy project which has resulted in a very cute and versatile box, love it!

What I used on this box:

  • Paper: Scraps from a sheet of Mariposa paper (DCWV).
  • Stamp: Vintage Man (Hero Arts)
  • Flowers (Prima)
  • Ephemera (K&Co)
  • Flower Jewel Sticker (K&Co)


Have a great day!

Monday, December 27, 2010

From Trash to Treasure #2

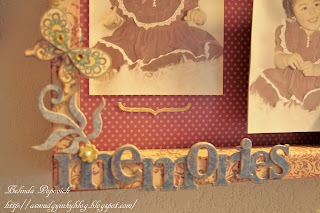
I have 2 pictures of my Mom that are sweet and hilarious so I thought they would be a perfect candidate for one of my Trash to Treasure shadow boxes. I also got to use a few new colors from the Regals Classics Ink Pads i got for Christmas :D


For this frame I used a basic Ivory card stock around the outer part of the frame and layered it with stamped images to give it the vintage feel. 


Here is it on my wall, I like to stagger my frames to they all fit together like puzzle pieces, this is currently a work in progress.

What I used on this project:
  • Paper: 12x12 Purple polka dot paper (SU Regals), 12x12 Ivory card stock (maker unknown)
  • Stamps: Friends 24-7(SU-wood mount), French Foliage (SU - wood mount)
  • Inks: Espresso, Always Artichoke, Bravo Burgundy, Cherry Cobbler (SU -Classics), Fired Brick and Frayed Burlap (TH Distress Inks)
  • Flowers ( Prima and Hero Arts )
  • Snaps (Making Memories)
  • Stickers: Memories (K & Co) Butterflies (K & Co)
  • Frame: An old awards frame courtesy of my friend Tracy.


Thanks for lookin',

Saturday, December 25, 2010


From my family to you and your family,
Merry Christmas.

I hope all of you were blessed with priceless memories and tummies filled with yummy food!

Lots of Love,

Wednesday, December 22, 2010

A Delicate Snowflake -Tutorial


I've been dying to make these super cool snowflakes! I had watched a few video tutorials on making these but found the results from the use of the stapler to be a little crude looking so I started to tweak a few things to give me the results I wanted. 


Supplies:
  • Hot Glue Gun
  • Bone Folder (mine looks pretty messed up huh, I'll tell you the story of that another day)
  • Scissors
  • Pencil
  • 6 - 6x6 squares of cardstock, double or single sided
  • Paperclips are optional, we used these when I started to cut out lots of different papers so this is purely for organizational purposes.
*Note on paper: We made some out of regular thin pattered paper but those were pretty flimsy. We got the best results from cardstock. With some of the stiffer sheets I gave them a light spritzing of water to loosen them up.


 Step 1: Fold Paper in half making a triangle


Step 2: Fold the in half again. Flip it so the long side is on top and point at the bottom. I drew 4 lines onto the paper where I will make my cuts so its easy to see on the first one.


Step 3: Cut from the folded side in towards the two open flaps of the triangle. Its also a good idea to hold the long top side tightly while you cut so the paper wont slip and fan too much.


Step 4: Cut all 6 sheets and then open them up. This is when I spritzed them with water to make the bending a little more easier.


Step 5: Bend the center and then place a bit of hot glue to adhere them together. Your pretty much just matching point up to point in the whole gluing process so pretty basic.


Step 6: Flip the paper over and glue the next to triangles together. Repeat this process 3 more times going back and forth.


This is what it will look like once its all glued together.


Step 7: Once you have all 6 sheets glued to themselves you will want to start gluing the outter edges from one to another. If your working with a pattered papper you will want it to look like I've set it up. One plane side to glue to one pattered side.


Step 8: Glue them all together to make a neat little line like this. Now you will glue the 1st and 6th paper pieces together to create your snowflake. 
* Note: I found out after a few that if you do the next step before you glue them into the circle it makes it a little easier. so you would take paper #2 and glue to paper #3 then glue #4 to #5 and do #1 and  #6 last.

These are two bottom ends, I lightly bend them and then glue one the other. This is easiest if you do it as I described above before gluing them into their circular form.


Step 10: You will want to bend those curves on the bottom edges into points. This will make them come together much better and look very clean. Then to finish it of put a few triggers worth of hot glue in the center and then push them all together. 
Wha-la your done!...or are you.....
After we did a few I realized we needed to add some pizzaz to these puppies! Here are some of our completed Snowflakes, some with a little bling, others with lots.


These are just a few of the ones we've made. On the ones hanging from curtains we hot glued a bunch of faux pearls to give them some soft bling.

Thanks for checkin out my tutorial,


Monday, December 20, 2010

I'm still here!

So I had wanted to post my 2nd tutorial last week but that never happened, got pretty busy. Today I finally finished making my last Christmas card and got those sent off, woohoo! I celebrated tonight by making those really cool snowflakes with my MIL, we've made 12 of those big snowflakes and I did a tutorial on that which I will edit together in the morning, hopefully before I'm off to my Chiropractor.

If you haven't made these snowflakes you will have to try it out because it fulfills all 3 desires, their stylish, cheap and they will fill you with Christmas joy!

Oh wait I almost forgot to mention I had my first house sale close last week!!! I am a total happy camper, it was a great first time experience with a wonderful couple. So what does one do for such a sweet couple a week before Christmas?!? I went out with my hubby and chopped down a Christmas tree (well he did, I held the branch up for him to crawl under), made a few hand made ornaments and picked up a Hallmark Keepsake Ornament then set it up in her new house for her complete with the tree skirt too. With all the moving they'll be doing as his job having him work crazy hours I didnt think they'd have time to get a tree and it being their first Christmas in their new home they had to have a tree, Realtor to the Rescue!!!

I'll be back tomorrow with great pics to share, see you then!

Thursday, December 16, 2010

Happiness Held - PSC #4


So here is my creation for today, looks way simple right? Well it did require a little bit of work because that background piece was originally various shades of grey and beige. I added soft and subtle colors to it using Prisma colored pencils and a Blending Stump. This was also my first time getting to use the Stampin Up! ribbon and I must say I LOVE IT! I've experimented a little with ribbon before but didn't dig the feel it gave me (in my hands and working with it) but this ribbon had some nice weight to it, didn't fray easily and made it easy to tie my pretty bow.


What I used on this card:


Thanks for lookin' in,

Tuesday, December 14, 2010

From Trash to Treasure


So here is a little project I finally completed. My friend Tracy gave me a few old frames that used to house some of her Riffle Medals (she had lots because she was AWESOME at it!) from when she would compete in shooting competitions. Well the frames were pretty gnarly looking and had that garage storage smell to em but I thought I could make it into something cool and decided to give it a shot. This is also my first attempt at making something like this so I had no idea what I was doing but as my mom has told me many times in my life, "If its dirty and smelly just take a Baby Wipe to it and that will spiffy it up in a jiff.", and that is just what I did!


About halfway into this project my DH came rushing up to me yelling WHAT ARE YOU DOING?!?!? Your supposed to take pictures and make a tutorial out of that! I pointed to my box full of these frames and said I have plenty to make one next time.

Oh I want to add a little review for the Basic Gray Rub Ons I used...how do I put it nicely...they sucked! I loved the design of them and the cool bling to go with them but they were hard to work with, the bling adhesive was funky kept falling off of the bling in the transfer so I had to use my own adhesive to stick them on, no biggie except for the ones that were able to stick eventually fell off leaving the adhesive behind. When I attempted to restick it wouldn't work so I had to pull off the adhesive carefully but this ment some of my design got ripped off with it :(.  This was not my first attempt at Rub Ons either so I knew how to put them on but these were just bad and I was very dissatisfied with the quality. I have like 4 more of these left to use and I cant say I'm looking forward to it.

What I used on this frame:
  • An Old Shadow boxish type frame
  • Paper: Kraft (Generic), Red Riding Hood Designer Paper (SU! Rich Regals Pad)
  • Rub Ons: Basic Grey with bling, around the frame was from a set I lost the cover for so dunno who made em.
  • Christmas Tree (Department 56)
  • Stickers (K&Co)
  • Ink: Early Espresso (SU!), Fired Brick and Frayed Burlap (Distress Ink TH)
Have a great day!


Wedgwood Inspired PSC #3


While I was out at HomeGoods I was perusing through the Christmas ornaments section and came across several ornaments made by Wedgwood like the one above. So when I got home I thought I'd make a card and just happened to find a very pretty blue in pile and so I made this card. Although the Wedgwood is typically just blue and white as well as very clean lined I just had to add my vibe to it by getting it at least a little inky and smudgy.


I love those these cards came out, although still clean lined (which I must add was very, very hard not to try to Zest the edges of the blue) it still has a sense of my style in it. I'd also like to add that I really, really love Liquid Pearl! That stuff just rocks, I love how I could add just a touch of white to break up the blue and not loose that dainty feel.

What I used on this card:
  • Paper: White (Generic), Blue (from a scrapbook kit I bought almost 2 years ago!)
  • Stamps: Baroque Motifs (SU!), Simple Sentiments (SU! Exclusive Hostess Set)
  • Ink: Crumb Cake (SU!), Early Espresso (SU!)
  • Liquid Pearl

Thanks for stopping by,